Goodbye G Analytics, Hello Umami!
Hello, I'm Munou.
I had been using Google Analytics until now, but this time I decided to introduce Umami as an open-source analytics collection tool.
Umami
Why did I install it?
When checking site performance, Google Analytics' JS code is loaded remotely, and it was incredibly slow, which I disliked.
To be honest, since I have ads, I shouldn't really complain, but Google Analytics seemed to be particularly negatively impacting the overall results loading.
Another option would be to install the gtag code locally to reduce unnecessary traffic, but at that time, I happened to see the following blog:
mimoex's blog
And when I looked at its privacy policy, it said something like
We utilize Umami as an access analysis tool.
It was written there, and my curiosity led me to research it. I figured seeing it at this timing must be fate, so I decided to implement it.
By the way, there are really no Japanese articles. Well, I guess you could say there are still some, but not many.
What is Umami?
It's an open-source access analysis tool.
It doesn't require cookies and anyone can easily set it up.
There isn't much information in Japanese, but I tried setting it up.
How to Install
First, let's pull the source code.
sudo git clone -b dev https://github.com/umami-software/umami.git
This time, I'll try using the developer version.
Then, yarn install
yarn install
Preparing the DB
We will create tables and users in MySQL.
sudo mysql
mysql> CREATE USER 'umamiuser'@'localhost' IDENTIFIED BY 'YourPassword';
mysql> CREATE DATABASE umami;
mysql> GRANT ALL PRIVILEGES ON umami.* TO 'umamiuser'@'localhost';
mysql> FLUSHPRIVILEGES;
mysql> exit
For the DB password,
echo -n "YourLikePharse" | sha256sum
I used the output from the above.
I believe this method is the easiest and most secure way to generate a password within an individual's capabilities.
This concludes the DB setup for now.
.env Configuration
We will configure the port to use and the DB connection destination.
At this point, let's generate the string to be used for APP_SECRET.
openssl rand -base64 30
Copy this value.
vim .env
I configured it as follows:
DATABASE_URL=mysql://umamiuser:YourPassword@localhost:3306/umami
APP_SECRET=openssl rand -base64 30で生成した値
PORT=8050
HOSTNAME=稼働させるIP(私はWireGuard上のIPを指定)
Run Umami
Although the official documentation recommends using pm2, I generally run it with `npm start` so that processes are easy to identify from `ps -ef`.
npm run start-env
After that, I set up a reverse proxy on the Nginx side and finished.
Site Configuration
Access Umami via HTTP, and log in with the default settings:
User : admin
Password : umami
Be sure to change them.
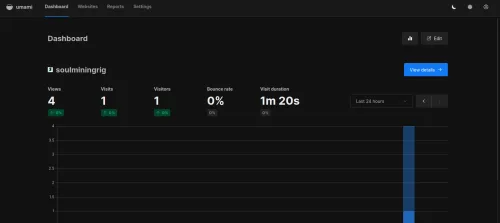
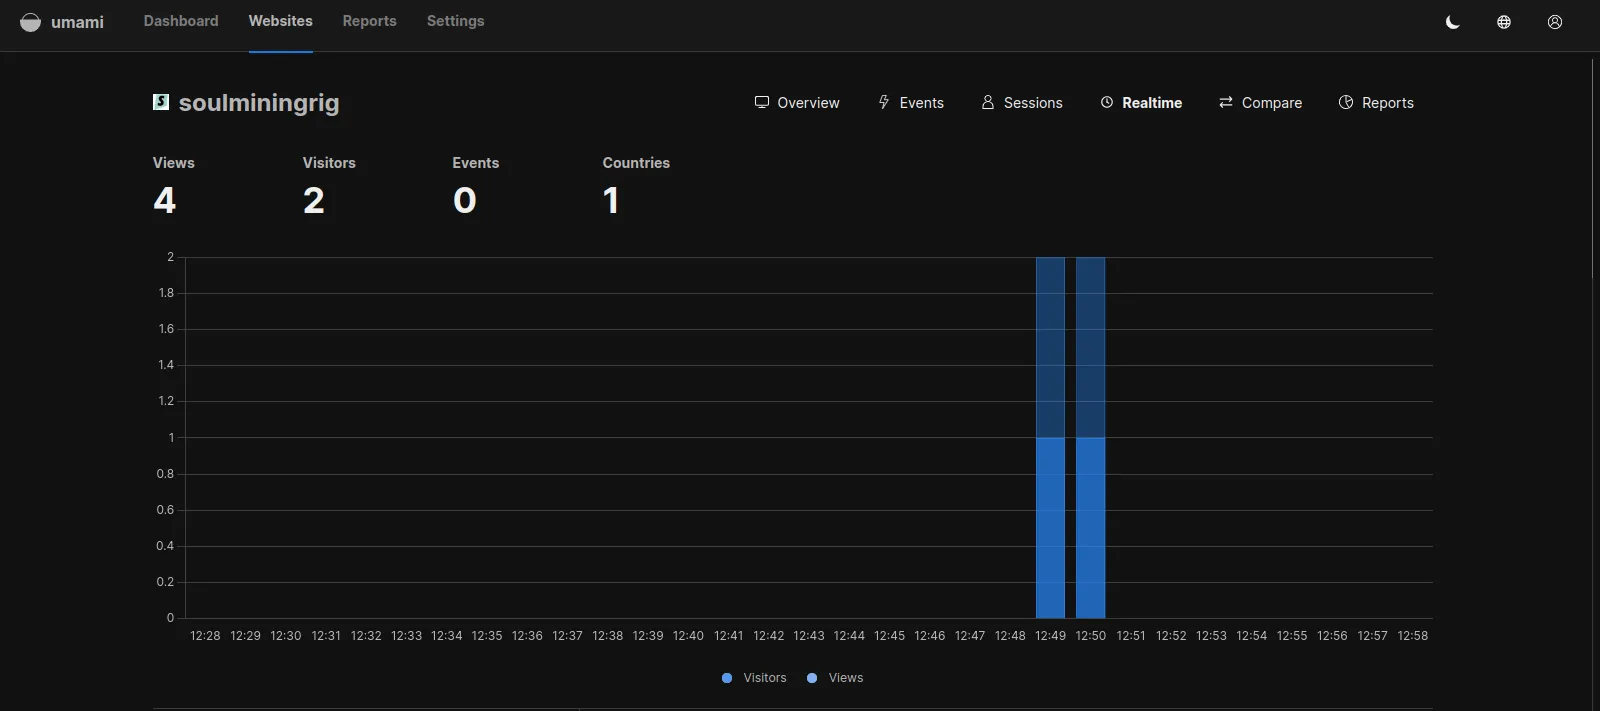
Amazing....!!
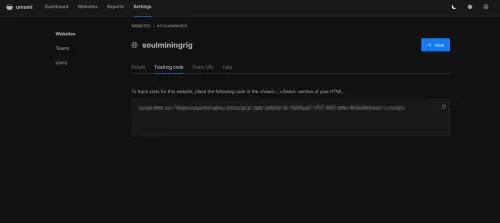
Then, just like Gtag, the code to be placed in the <head> section will appear, so simply insert it into the site you want to track.
This is... truly amazing...
Ultimately, it's also kind to the site
Although there are other JS files being loaded, Lighthouse recorded high performance results.
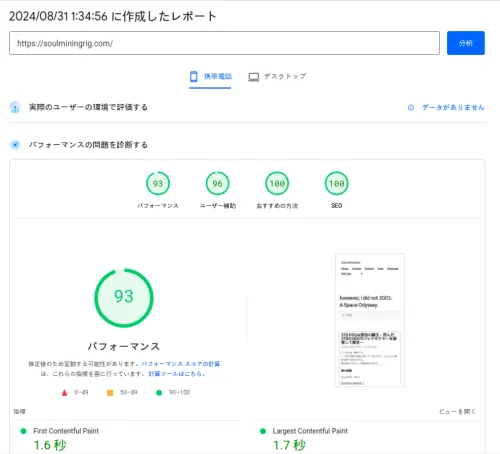
Well, as I've said many times, this benchmark is by no means everything.
But getting a good score with this is just something that makes benchmark enthusiasts happy.
See you next time.
(Actually, I had planned to work on my self-hosted Terraform after learning it could be used with qemu.)
This is how it went, thank you for your understanding.
Thank you for today.