Migrating a FreeBSD Environment from Vultr to ConoHa while Drunk
Hello, I'm incompetent.
I'm almost dead, but I'm migrating from Vultr to ConoHa, so here are some notes.
-> I got drunk at home and fell asleep, so I'm writing this today, which is almost the next day
Vultr FreeBSD
$ pkg info | awk '{print $1}' | sed "s/^/pkg install -y /g"
pkg install -y base91-0.6.0_1
pkg install -y brotli-1.1.0,1
pkg install -y cgit-1.2.3_1
pkg install -y curl-8.12.1
pkg install -y dnsmasq-2.90_4,1
pkg install -y doas-6.3p12
pkg install -y expat-2.7.0
pkg install -y fcgi-devkit-2.4.0_6
pkg install -y fcgiwrap-1.1.0_12
pkg install -y gettext-runtime-0.23
pkg install -y git-2.49.0
pkg install -y gmp-6.3.0
pkg install -y go-1.21_5,2
pkg install -y go121-1.21.13_1
pkg install -y indexinfo-0.3.1
pkg install -y libffi-3.4.6
pkg install -y libidn2-2.3.7
pkg install -y liblz4-1.10.0,1
pkg install -y libnghttp2-1.65.0
pkg install -y libpsl-0.21.5_2
pkg install -y libssh2-1.11.1,3
pkg install -y libunistring-1.2
pkg install -y mpdecimal-4.0.0
pkg install -y nettle-3.10.1
pkg install -y nginx-1.26.3_2,3
pkg install -y p5-Authen-SASL-2.17_1
pkg install -y p5-CGI-4.67
pkg install -y p5-Clone-0.47
pkg install -y p5-Digest-HMAC-1.05
pkg install -y p5-Encode-Locale-1.05
pkg install -y p5-Error-0.17030
pkg install -y p5-HTML-Parser-3.83
pkg install -y p5-HTML-Tagset-3.24
pkg install -y p5-HTTP-Date-6.06
pkg install -y p5-HTTP-Message-7.00
pkg install -y p5-IO-HTML-1.004
pkg install -y p5-IO-Socket-IP-0.43
pkg install -y p5-IO-Socket-SSL-2.089
pkg install -y p5-LWP-MediaTypes-6.04
pkg install -y p5-Mozilla-CA-20250202
pkg install -y p5-Net-SSLeay-1.94
pkg install -y p5-TimeDate-2.33,1
pkg install -y p5-URI-5.31
pkg install -y pcre2-10.45
pkg install -y perl5-5.36.3_2
pkg install -y python311-3.11.11
pkg install -y readline-8.2.13_2
pkg install -y zstd-1.5.7
ConoHa FreeBSD
./pkg-install.sh | tee pkg-install.log
Vultr FreeBSD
$ pkg info | awk '{print $1}' | sed "s/^/pkg install -y /g"
pkg install -y base91-0.6.0_1
pkg install -y brotli-1.1.0,1
pkg install -y cgit-1.2.3_1
pkg install -y curl-8.12.1
pkg install -y dnsmasq-2.90_4,1
pkg install -y doas-6.3p12
pkg install -y expat-2.7.0
pkg install -y fcgi-devkit-2.4.0_6
pkg install -y fcgiwrap-1.1.0_12
pkg install -y gettext-runtime-0.23
pkg install -y git-2.49.0
pkg install -y gmp-6.3.0
pkg install -y go-1.21_5,2
pkg install -y go121-1.21.13_1
pkg install -y indexinfo-0.3.1
pkg install -y libffi-3.4.6
pkg install -y libidn2-2.3.7
pkg install -y liblz4-1.10.0,1
pkg install -y libnghttp2-1.65.0
pkg install -y libpsl-0.21.5_2
pkg install -y libssh2-1.11.1,3
pkg install -y libunistring-1.2
pkg install -y mpdecimal-4.0.0
pkg install -y nettle-3.10.1
pkg install -y nginx-1.26.3_2,3
pkg install -y p5-Authen-SASL-2.17_1
pkg install -y p5-CGI-4.67
pkg install -y p5-Clone-0.47
pkg install -y p5-Digest-HMAC-1.05
pkg install -y p5-Encode-Locale-1.05
pkg install -y p5-Error-0.17030
pkg install -y p5-HTML-Parser-3.83
pkg install -y p5-HTML-Tagset-3.24
pkg install -y p5-HTTP-Date-6.06
pkg install -y p5-HTTP-Message-7.00
pkg install -y p5-IO-HTML-1.004
pkg install -y p5-IO-Socket-IP-0.43
pkg install -y p5-IO-Socket-SSL-2.089
pkg install -y p5-LWP-MediaTypes-6.04
pkg install -y p5-Mozilla-CA-20250202
pkg install -y p5-Net-SSLeay-1.94
pkg install -y p5-TimeDate-2.33,1
pkg install -y p5-URI-5.31
pkg install -y pcre2-10.45
pkg install -y perl5-5.36.3_2
pkg install -y python311-3.11.11
pkg install -y readline-8.2.13_2
pkg install -y zstd-1.5.7
ConoHa FreeBSD
Install what was output above.
I'll output it with tee so I can check the contents later.
./pkg-install.sh | tee pkg-install.log
pf
I had already put in most of the pf settings, so
root@localhost:~ # pfctl -nf /etc/pf.conf
root@localhost:~ # pfctl -f /etc/pf.conf
pfctl: /dev/pf: No such file or directory
Oh, it seems it's not enabled by default.
root@localhost:~ # kldload pf
root@localhost:~ # pfctl -f /etc/pf.conf
root@localhost:~ #
It's not enabled even after rebooting, so I'll explicitly enable it to load at startup.
echo 'pf_load="YES"' >> /boot/loader.conf
echo 'pflog_load="YES"' >> /boot/loader.conf
WireGuard
I will create the same conf using the output from the Vultr side as is.
vim /usr/local/etc/wireguard/wg0.conf
chmod 600 /usr/local/etc/wireguard/wg0.conf
chmod 700 /usr/local/etc/wireguard
wg-quick up wg0
With this, I enabled 51820/UDP in ConoHa's security group, and connectivity was confirmed on the client side.
Add the following to /etc/rc.conf to enable automatic startup.
wireguard_enable="YES"
wireguard_interfaces="wg0"
And, I will prevent openai.com from being routed.
Enable ChatGPT to be used even under a VPN environment - SOULMINIGRIG
dnsmasq
Checking Vultr side settings
# cd /usr/local/etc
# grep -v '^#' dnsmasq.conf | grep -v '^$'
no-resolv
server=1.1.1.1
interface=wg0
listen-address=10.0.0.1
log-queries
conf-dir=/usr/local/etc/dnsmasq.d
Apply these settings to the ConoHa side and pull the following adblock.conf
GitHub - haturatu/dnsmasq-blockdns
# curl -o adblock.conf https://raw.githubusercontent.com/haturatu/dnsmasq-blockdns/refs/heads/main/adblock.conf
-sh: curl: not found
root@localhost:/usr/local/etc/dnsmasq.d # pkg install curl
Updating FreeBSD repository catalogue...
FreeBSD repository is up to date.
All repositories are up to date.
The following 1 package(s) will be affected (of 0 checked):

New packages to be INSTALLED:
        curl: 8.14.1

Number of packages to be installed: 1

The process will require 5 MiB more space.
2 MiB to be downloaded.

Proceed with this action? [y/N]: y
I hadn't even installed curl in the first place ^^;
# service dnsmasq restart
Performing sanity check on dnsmasq configuration.
dnsmasq: syntax check OK.
Performing sanity check on dnsmasq configuration.
dnsmasq: syntax check OK.
Stopping dnsmasq.
Starting dnsmasq.
With this, it's complete if you configure the client-side WireGuard settings to query the DNS server at 10.1.0.1.
Nginx
I will allow 80/tcp and 443/tcp publicly in ConoHa's security rules.
Then, Nginx installed via pkg will already have nginx_enable="YES" automatically added to /etc/rc.conf, so it's fine.
I'll postpone the conf settings until I've done all the other configurations. I only confirmed that Nginx's default page is displayed on port 80.
Postfix
This is tough. So, I thought I'd feed the output of cat main.cf | grep -v '^#' | grep -v '^$' directly to ChatGPT to generate scp commands to copy all necessary files... but when I tried ssh, I couldn't reach it.
Actually, I noticed this when I was using WireGuard on Vultr, but it seems ConoHa blocks some overseas IPs at a higher layer, so it's not possible to reach the corresponding global IP even from a server hosted on ConoHa. Even when I tail -f Vultr's auth.log, no logs appear.
I thought I might be able to make it work by creating a WireGuard tunnel, but it's too much hassle to rewrite the settings again with the same configuration as Vultr...
Therefore, I will copy them via the path: Old Server → My Machine → New Server.
$ cat scp-postfix.sh
#!/bin/bash
scp darkstar@vultr-freebsd:/usr/local/etc/postfix/main.cf main.cf.old
scp darkstar@vultr-freebsd:/usr/local/etc/postfix/recipient_access recipient_access.old
scp darkstar@vultr-freebsd:/usr/local/etc/postfix/client_access client_access.old
scp darkstar@vultr-freebsd:/usr/local/etc/postfix/sender_access sender_access.old
scp darkstar@vultr-freebsd:/etc/mail/aliases aliases.old

sed 's/old-ipv4/new-ipv4/g' main.cf.old > main.cf.new

scp main.cf.new root@conoha-freebsd:/usr/local/etc/postfix/main.cf
scp recipient_access.old root@conoha-freebsd:/usr/local/etc/postfix/recipient_access
scp client_access.old root@conoha-freebsd:/usr/local/etc/postfix/client_access
scp sender_access.old root@conoha-freebsd:/usr/local/etc/postfix/sender_access
scp aliases.old root@conoha-freebsd:/etc/mail/aliases
For certificates, I'll first archive them with tar, place them in the ssh user's directory, retrieve them, and then transfer them with scp.
Vultr side
tar czvf letsencrypt.tar.gz /usr/local/etc/letsencrypt
cp letsencrypt.tar.gz /home/hoge/
chown hoge:hoge /home/darkstar/letsencrypt.tar.gz
By the way, when using scp, it's easy to output the full path with realpath and then directly copy-paste the source path for verification. And, certbot wasn't installed...
pkg install -y py311-certbot-nginx-4.0.0
echo 'weekly_certbot_enable="YES"' >> /etc/periodic.conf
Now, placing them in /usr/local/etc/letsencrypt on the ConoHa side is fine.
Proper permission management
cd /usr/local/etc/letsencrypt
find /usr/local/etc/letsencrypt -type d -exec chmod 700 {} \;
find /usr/local/etc/letsencrypt -type f -exec chmod 600 {} \;
Re-hash on ConoHa
# which postmap
/usr/local/sbin/postmap
cd /usr/local/etc/postfix
postmap recipient_access
postmap client_access
postmap sender_access
newaliases
# postfix check
/usr/local/sbin/postconf: warning: /usr/local/etc/postfix/main.cf: support for parameter "smtp_use_tls" will be removed; instead, specify "smtp_tls_security_level"
👀
I will change the settings
# smtp_use_tls = yes
smtp_tls_security_level = may
Again
# postfix check
Restart
# service postfix restart
postfix/postfix-script: stopping the Postfix mail system
postfix/postfix-script: starting the Postfix mail system
Dovecot
I hadn't created a user yet, so I'll create one.
pw useradd taro -u 1002 -g mail -d /home/taro -s /usr/sbin/nologin -m
passwd taro
I'll dump the settings from the Vultr side and create /usr/local/etc/dovecot/dovecot.conf on the ConoHa side as is.
dovecot -n
rehash
cd /usr/local/etc/postfix
postmap recipient_access
postmap client_access
postmap sender_access
newaliases
For now, next is OpenDKIM
OpenDKIM
I completely forgot, but OpenDKIM has its settings in the mail directory... I forgot.
# realpath opendkim.conf
/usr/local/etc/mail/opendkim.conf
I had kept it quite simple
root@vultr:/usr/local/etc/mail # cat TrustedHosts
eyes4you.org
mail.eyes4you.org

root@vultr:/usr/local/etc/mail # cat SigningTable
eyes4you.org default._domainkey.eyes4you.org
mail.eyes4you.org default._domainkey.eyes4you.org
root@vultr:/usr/local/etc/mail # cat opend
cat: opend: No such file or directory
root@vultr:/usr/local/etc/mail # cat opendkim.conf
##
## opendkim.conf -- configuration file for OpenDKIM filter
##
## Copyright (c) 2010-2015, The Trusted Domain Project.  All rights reserved.
##
Canonicalization        simple/simple
Domain                  eyes4you.org
KeyFile                 /var/db/dkim/eyes4you.org.private
LogWhy                  yes
Mode                    sv
ReportAddress           "DKIM Error Postmaster" <postmaster@eyes4you.org>
Selector                default
SendReports             yes
Socket                  inet:8891@localhost
SubDomains              yes
Syslog                  Yes
SyslogSuccess           yes
UMask                   002
InternalHosts           /usr/local/etc/mail/TrustedHosts
SigningTable            /usr/local/etc/mail/SigningTable
KeyTable                /usr/local/etc/mail/KeyTable
root@vultr:/usr/local/etc/mail # ls -lrta
total 108
-rw-r--r--   1 root wheel    56 Aug 21  2023 opendmarc_ignore.hosts
-rw-r--r--   1 root wheel 15502 Aug 21  2023 opendmarc.conf
-rw-r--r--   1 root wheel 21800 Jan  7  2024 opendkim.conf.samplea
-rw-r--r--   1 root wheel    32 Feb  4  2024 TrustedHosts
-rw-r--r--   1 root wheel    88 Feb  4  2024 KeyTable
-rw-r--r--   1 root wheel    95 Feb  4  2024 SigningTable
-rw-r--r--   1 root wheel   765 Feb  4  2024 opendkim.conf
-rw-r--r--   1 root wheel 21800 Jul  6  2024 opendkim.conf.sample
-rw-r--r--   1 root wheel 15475 Jul  6  2024 opendmarc.conf.sample
drwxr-xr-x   2 root wheel   512 Jul 20  2024 .
drwxr-xr-x  21 root wheel  1024 Apr 18 07:11 ..
root@vultr:/usr/local/etc/mail #
Bring the private key and grant permissions
It should ideally not be mailnull...
chown mailnull:mailnull /var/db/dkim/*.private
chmod 600 /var/db/dkim/*.private
Now that I think about it, I had two TXT records for this name in the past, but default should be enough...
Additionally, delete any private and public keys that are not being referenced.
Migrating Existing Mail Directory
Archive with tar and move directly with scp.
Place the mail directory in the same destination and grant permissions.
# chown -R taro:mail /home/taro/Maildir
# chmod -R 700 /home/taro/Maildir
# doveadm mailbox list -u taro
Junk
Drafts
Sent
Trash
INBOX
After rebooting, I configured Socket inet:8891@localhost, so I'll check if the daemon is running.
# lsof | grep 8891
opendkim   975 mailnull    3u     IPv4    0xfffff80010f24a80        0    TCP localhost:8891->*:* (LISTEN)
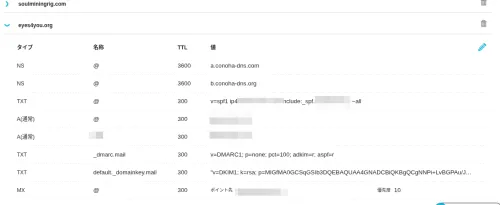
Mail Server NS Transfer
Transfer from Onamae to ConoHa
Domain -> Domain Function List -> Name Server Settings
From there, under 2. Select Name Server, choose Other and register ConoHa's DNS servers a.conoha-dns.com and b.conoha-dns.com.
This will make DNS record queries refer to ConoHa's DNS.
~~ Digression ~~
For slaves of Google
Check if it can be resolved with dig
Google's DNS is not working at all...
thepassenger:[haturatu]:~$ dig  eyes4you.org NS @1.1.1.1 +short
a.conoha-dns.com.
b.conoha-dns.org.
thepassenger:[haturatu]:~$ dig  eyes4you.org NS @8.8.8.8 +short
02.dnsv.jp.
04.dnsv.jp.
01.dnsv.jp.
03.dnsv.jp.
thepassenger:[haturatu]:~$ dig  eyes4you.org NS @8.8.4.4 +short
03.dnsv.jp.
02.dnsv.jp.
04.dnsv.jp.
01.dnsv.jp.
By the way, I forgot to add the MX record once ^^;
thepassenger:[haturatu]:~$ dig  eyes4you.org TXT @1.1.1.1 +short
"v=spf1 ip4:163.44.113.145 include:_spf.eyes4you.org ~all"
thepassenger:[haturatu]:~$ dig  eyes4you.org MX @1.1.1.1 +short
10 mail.eyes4you.org.](thepassenger:[haturatu]:~$ dig _dmarc.mail.eyes4you.org TXT @1.1.1.1 +short
"v=DMARC1; p=none; pct=100; adkim=r; aspf=r"
thepassenger:[haturatu]:~$ dig default._domainkey.mail.eyes4you.org TXT @1.1.1.1 +short
"v=DKIM1; k=rsa; p=MIGfMA0GCSqGSIb3DQEBAQUAA4GNADCBiQKBgQCgNNPi+LvBGPAu/J4ze0LWJyCHv1UJqS/ZJBg3mY2W6bQyr6Ele1x2KDYWspglyeXuP/gJB/RhXric+73/AImw5ggbT4LGtxcywxeYPNQaHvXiIKfq8sdFR2L80I3E2qamQEKYGJHJuCVw0w3zS22bq+YFq5n9kEQW2iC7k5EGlwIDAQAB"
thepassenger:[haturatu]:~$ dig mail.eyes4you.org A @1.1.1.1 +short
163.44.113.145
thepassenger:[haturatu]:~$ dig eyes4you.org MX @1.1.1.1 +short
10 mail.
thepassenger:[haturatu]:~$ dig eyes4you.org MX @1.1.1.1 +short
10 mail.eyes4you.org.
Time for a test!
However, when I tried to log in, I was rejected... Looking at tail -f, I see
# tail -f /var/log/dovecot.log
Sep 14 10:00:31 imap-login: Error: Failed to initialize SSL server context: Couldn't parse private SSL key (ssl_key setting) (maybe ssl_key_password is wrong?): error:1E08010C:DECODER routines::unsupported: No supported data to decode. Input type: PEM: user=<>, rip=hogeip, lip=hogeip, session=<EmHcabg+6cfOU23o>
Sep 14 10:00:31 auth: Debug: Loading modules from directory: /usr/local/lib/dovecot/auth
Sep 14 10:00:31 auth: Debug: Module loaded: /usr/local/lib/dovecot/auth/lib20_auth_var_expand_crypt.so
Sep 14 10:00:31 auth: Debug: Wrote new auth token secret to /var/run/dovecot/auth-token-secret.dat
Sep 14 10:00:31 auth: Debug: auth client connected (pid=1559)
Sep 14 10:00:31 imap-login: Error: Failed to initialize SSL server context: Couldn't parse private SSL key (ssl_key setting) (maybe ssl_key_password is wrong?): error:1E08010C:DECODER routines::unsupported: No supported data to decode. Input type: PEM: user=<>, rip=hogeip, lip=hogeip, session=</2rnabg+aUzOU23o>
Sep 14 10:00:34 auth: Debug: auth client connected (pid=1560)
Sep 14 10:00:34 imap-login: Error: Failed to initialize SSL server context: Couldn't parse private SSL key (ssl_key setting) (maybe ssl_key_password is wrong?): error:1E08010C:DECODER routines::unsupported: No supported data to decode. Input type: PEM: user=<>, rip=hogeip, lip=hogeip, session=<scwJarg+ZnfOU23o>
Sep 14 10:00:34 auth: Debug: auth client connected (pid=1561)
Sep 14 10:00:34 imap-login: Error: Failed to initialize SSL server context: Couldn't parse private SSL key (ssl_key setting) (maybe ssl_key_password is wrong?): error:1E08010C:DECODER routines::unsupported: No supported data to decode. Input type: PEM: user=<>, rip=hogeip, lip=hogeip, session=<w0cVarg+IujOU23o>
Hmm, I thought... and then realized that some private key paths in the dovecot -n output seemed to be hidden.
ssl = required
ssl_cert = </usr/local/etc/letsencrypt/live/mail.eyes4you.org/fullchain.pem
ssl_client_ca_dir = /etc/ssl/certs
ssl_dh = # hidden, use -P to show it
ssl_key = # hidden, use -P to show it
userdb {
  driver = passwd
}
With this, the receiving server connected.
Next, Postfix for sending
...also didn't connect, so I investigated.
Vultr side
root@vultr:/usr/local/etc/postfix # grep -r submission | grep -v "\#"
./main.cf.default:known_tcp_ports = lmtp=24, smtp=25, smtps=submissions=465, submission=587
./master.cf:submission inet n       -       n       -       -       smtpd
root@vultr:/usr/local/etc/postfix # grep -r 587
./main.cf.default:known_tcp_ports = lmtp=24, smtp=25, smtps=submissions=465, submission=587
./master.cf:#587      inet  n       -       n       -       -       smtpd
root@vultr:/usr/local/etc/postfix # sockstat -4 -l | grep 587
postfix  smtpd      97537 6   tcp4   *:587                 *:*
root     master      1221 18  tcp4   *:587                 *:*
It should be OK since it's accepting connections, and I thought I had brought everything over with scp, but I forgot master.cf in the copy script!
ConoHa side
root@localhost:/usr/local/etc/postfix # service postfix restart
postfix/postfix-script: stopping the Postfix mail system
postfix/postfix-script: starting the Postfix mail system
root@localhost:/usr/local/etc/postfix # sockstat -4 -l | grep 25
root     master      1912 13  tcp4   *:25                  *:*
root@localhost:/usr/local/etc/postfix # sockstat -4 -l | grep 587
root     master      1912 18  tcp4   *:587                 *:*
root@localhost:/usr/local/etc/postfix #
OK~
It connected successfully! Since this has gotten long, I'll continue shortly. See you then.