破 - 在GCP免費方案上建立Git伺服器 - Gitea安裝篇
大家好,我是無能。
這次是關於在GCE上安裝Gitea以及設定WireGuard VPN的部分。
安裝所需元件
雖然不太好,但我將使用root使用者進行操作。
詳細資訊請參考官方文件。
apt install -y git mariadb-server mariadb-client
adduser \
   --system \
   --shell /bin/bash \
   --gecos 'Git Version Control' \
   --group \
   --disabled-password \
   --home /home/git \
   git
mkdir -p /var/lib/gitea/{custom,data,log}
chown -R git:git /var/lib/gitea/
chmod -R 750 /var/lib/gitea/
mkdir /etc/gitea
chown root:git /etc/gitea
chmod 770 /etc/gitea
ufw allow 3000/tcp
ufw reload
使用wget取得最新的二進位檔。
wget -O gitea https://dl.gitea.com/gitea/1.22.4/gitea-1.22.4-linux-amd64
chmod +x gitea
mv gitea /usr/local/bin/gitea
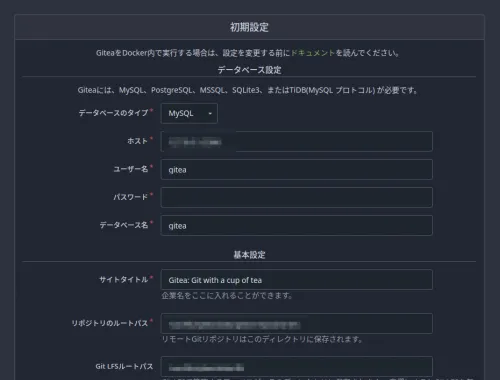
資料庫設定
mysql -u root -p
CREATE DATABASE gitea;
CREATE USER 'gitea'@'localhost' IDENTIFIED BY 'yourpassword';
GRANT ALL PRIVILEGES ON gitea.* TO 'gitea'@'localhost';
FLUSH PRIVILEGES;
EXIT;
守護行程檔案設定
我通常使用Supervisor進行設定,但這次決定嘗試Systemd。
我設定如下:
$ sudo cat /etc/systemd/system/gitea.service
[Unit]
Description=Gitea (Git with a cup of tea)
After=network.target

[Service]
User=git
Group=git
WorkingDirectory=/var/lib/gitea
ExecStart=/usr/local/bin/gitea
Restart=always
Environment=USER=gitea HOME=/home/git GITEA_WORK_DIR=/var/lib/gitea

[Install]
WantedBy=multi-user.target
systemctl enable gitea
systemctl start gitea
systemctl status gitea
● gitea.service - Gitea (Git with a cup of tea)
     Loaded: loaded (/etc/systemd/system/gitea.service; enabled; preset: enabled)
     Active: active (running) since Sun 2024-11-24 15:16:30 UTC; 3 days ago
   Main PID: 3276 (gitea)
      Tasks: 9 (limit: 1136)
     Memory: 114.6M
        CPU: 2min 4.743s
     CGroup: /system.slice/gitea.service
             └─3276 /usr/local/bin/gitea
~~~
如果像這樣顯示為Active,就表示正常。
設定WireGuard VPN
我經常設定WireGuard的客戶端,但因為覺得麻煩,所以決定盡可能地自動生成。
wg-genconf/wg-client.sh at main · haturatu/wg-genconf · GitHub
這是一個不太好的互動式腳本,但主要是我自己使用。
最後,這是一個簡單的設定,只需將「請在伺服器端設定以下內容。」直接貼到伺服器的conf檔案中即可完成。
如果看起來已連線,我將嘗試對Gitea的標準埠3000執行curl。
wg-quick up wg0
wg
伺服器端
wg-quick down wg0
wg-quick up wg0
wg
ping -c 5 10.1.0.6
curl 10.1.0.6:3000
如果Gitea頁面作為curl的標準輸出顯示,就表示正常。
DNS設定
將DNS記錄中git.mydomain.jp的目標設定為VPN伺服器端的A記錄IP位址,並使用nslookup確認何時生效,確認生效後即可進行下一步。
使用Nginx進行反向代理
由於DNS已成功更新,我也將使用certbot取得憑證。
server {
    if ($host = git.mydomain.jp) {
        return 301 https://$host$request_uri;
    } # managed by Certbot

    listen 80;
    server_name git.mydomain.jp;

    location / {
        proxy_pass http://10.1.0.6:3000/;
        proxy_set_header Host $host;
        proxy_set_header X-Real-IP $remote_addr;
        proxy_set_header X-Forwarded-For $proxy_add_x_forwarded_for;
        proxy_set_header X-Forwarded-Proto $scheme;

    }
}

server {
    listen 443 ssl;
    server_name git.mydomain.jp;

    location / {
        proxy_pass http://10.1.0.6:3000/;
        proxy_set_header Host $host;
        proxy_set_header X-Real-IP $remote_addr;
        proxy_set_header X-Forwarded-For $proxy_add_x_forwarded_for;
        proxy_set_header X-Forwarded-Proto $scheme;

    }
    ssl_certificate /usr/local/etc/letsencrypt/live/git.mydomain.jp/fullchain.pem; # managed by Certbot
    ssl_certificate_key /usr/local/etc/letsencrypt/live/git.mydomain.jp/privkey.pem; # managed by Certbot
}
順帶一提,如果要取得SSL憑證
certbot --nginx -d git.mydomain.jp
即可取得。
檢查語法並重新啟動
nginx -t
service nginx reload
在瀏覽器中確認
成功了。
那麼,接下來是Q。